Microsoft Defender Quarantine
Category: Office 365 Productivity and Business Audience: Faculty Researchers Staff Students
Microsoft Defender Quarantine is a feature integrated with Outlook to protect the university community from harmful emails and spam. It automatically holds suspicious emails in quarantine until reviewed and a decision is made if the messages should be delivered to their inbox or deleted. All faculty, staff and students have Microsoft Defender Quarantine enabled on their university Outlook Email account.
On this page:
- About Microsoft Defender Quarantine
- How to Check Quarantined Emails
- How to Release or Delete Emails
- Create a Mailbox Rule to Move Quarantine Email Notifications
- Customize Your Quarantine Navigation
- Additional Resources and Links
- Microsoft Quarantine YouTube Video
- Visit the FAQ Section to Learn How To Manage Your Safe or Blocked Senders List
About Microsoft Defender Quarantine
Microsoft Defender Quarantine provides an extra layer of protection from phishing and spam for the university. The feature empowers end users to release messages they previously would not have seen. Defender identifies suspicious emails and sends them to the user’s Quarantine where they can be safely previewed and deleted. Depending on the quarantine reason, you may also be able to release the email to your inbox. Additionally, you will have control over your own safe senders and blocked senders lists that can be edited at any time.
You will receive quarantine notification emails from [email protected] when there are messages for review.

Tip: Consider bookmarking https://security.microsoft.com/quarantine to easily check your Quarantine in the future.
The deleted items folder retention period is 30 days. After that, messages are automatically removed from the folder. Items that have been automatically removed from the Deleted Items folder are retained for 30 days before being permanently deleted.
Training Resources
Getting Started
Microsoft Defender Quarantine - Review, Release or Delete Emails
Step 1:
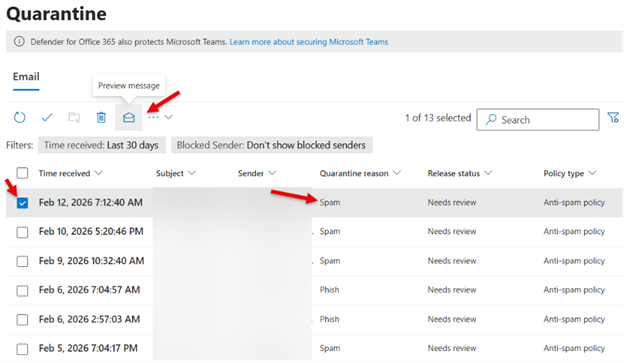
Go to https://security.microsoft.com/quarantine and login with your university email address and password.
Step 2:
Review list of emails that have been Quarantined and the quarantine reason. Click the checkbox next to an email and then select the Preview button to safely view the contents of that email.
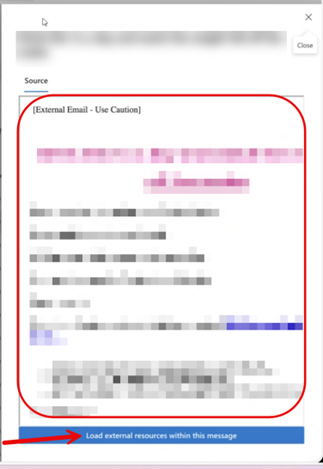
Step 3:
The Preview panel will show the contents of an email so you can verify if it's legitimate, spam or phishing. You can choose “Load external resources within this message” to view any pictures in the message. When finished, click the X in the top right corner to close the panel and return to Quarantine.
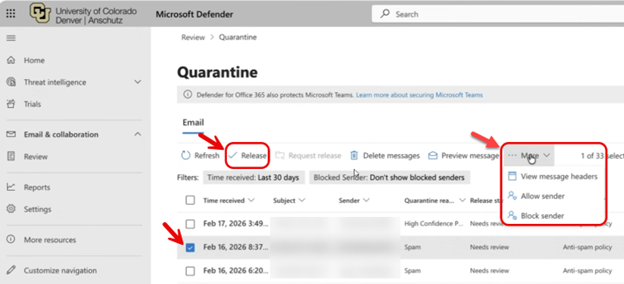
Step 4:
If an email has been quarantined in error, identify the “Quarantine Reason.”
For emails that are labeled “High Confidence Phish” - Forward the quarantine notification email to the Service Desk and request release. A support ticket will get opened and assigned to an administrator for review,
For emails that are labeled, “Spam,” “High Confidence Spam” and “Phish" - Click the checkbox next to the email and click "Release" to move the email to your mailbox. Then proceed to step 5 below.
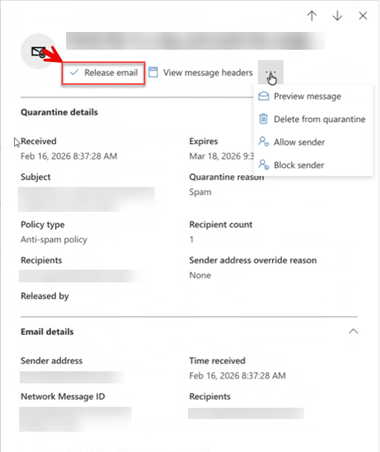
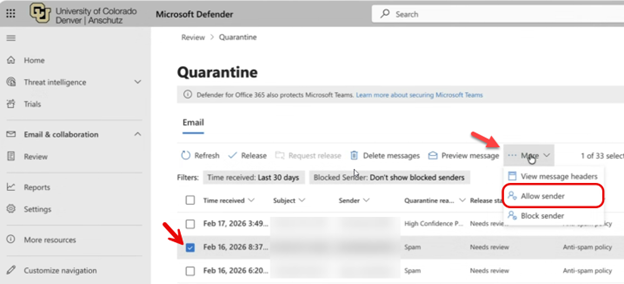
Step 5:
After releasing a message, you can click the “More” menu to Allow Sender (add to Safe Sender List) or Block Sender (add to Blocked Sender List).
- Adding to the Allow Sender List can prevent future emails from this sender from being quarantined.
- Adding to the Block Sender List does not completely block the sender from delivering emails to you. They will be delivered to Junk instead or will be hidden from view within Quarantine.
Alternatively, if you know it's unsafe or spam, you can click the "Delete Messages" button. You do not have to take action on those emails, however, as anything left in Quarantine will automatically be deleted after 30 days.
Step 6:
Confirm that you'd like to "Release message" to your mailbox. You also have the option to report the message as "Safe" which may improve the Microsoft Defender AI to not Quarantine these messages in the future.


Step 7:
The email's "Release Status" will change to "Released". Select the email and click the "Delete" icon to remove the message from your Quarantine list.

Note: The Deleted Items folder retention period is 30 days. After that, messages are automatically removed from the folder. Items that have been automatically removed from the Deleted Items folder are retained for 30 days before being permanently deleted.
What should I do if messages from a legitimate sender keep getting quarantined?
Legitimate messages can end up in the Quarantine due to several backend assessments Microsoft uses to determine whether an email poses a threat. Sometimes these are not real threats; however, because of how they are being sent, they can appear to be a phishing attempt. It could be that the sender's mailer is not configured properly, or an attachment/URL was detected as malicious and is a false positive. If you do not want these emails quarantined, you can try adding them to your Safe Sender List.
The easiest way is to select the message in your Quarantine, choose the "More" menu, and select Allow Sender. This automatically adds the sender's address to your Safe Sender's List.
*Note: Messages from the sender are still subject to Quarantine if a higher threat level is detected.

If you receive a message that you cannot release yourself, forward the notification email from Microsoft featuring the message you'd like released to the Service Desk. If it is deemed safe, the message will be released to your Inbox and reported to Microsoft to improve their detection for similar messages in the future. If it was quarantined due to a misconfigured mailer, future messages will continue to be quarantined until the sender corrects their mail configuration.
Create a Mailbox Rule to Move Quarantine Email Notifications
There is not an opt-out process for the Quarantine notifications, but you can create a rule in Outlook to move the emails to another folder if you do not want to receive notifications in your focused in-box. See the steps below for creating a rule.
Step 1:
Log in to your Outlook Web Account
Click on the Settings icon in the top right corner of the screen.
Step 2:
Select Mail, then Rules. Click Add New Rule.

Step 3:
Add a name for the rule, use the Form address [email protected], and then select the folder you want to move the messages to so that you can review them at a later time.

Customize Your Navigation
You can customize the left-hand navigation in Microsoft Defender so that the inaccessible options are not displayed.
Step 1:
Scroll to the bottom of the left-hand navigation pane. Click on Customize navigation.

Step 2:
In the Customization menu, uncheck all the boxes except for Review. This is the only navigation option needed to review emails in quarantine.

Help and Support
If you have any questions about Microsoft Defender Quarantine, please contact the Service Desk.